Pages

Showing newest 12 of 16 posts from March 2010. Show older posts

Wednesday, March 31, 2010

Recipe Flash: Smoked Mozzarella Tartlettes

SPRING FINGER FOOD MENU: Puff Pastry Wrapped Asparagus; Minted Sweet Pea Dip; Avocado and Radish Crostini

We've been playing around with a lot of tartlettes and pizzettes here at BGSK. The craze in our kitchen started back at our holiday dinner, when Phoebe topped mini circles of purchased pizza dough with caramelized onions, cheese, and arugula. Since, we've migrated to homemade pizza dough and to puff pastry. But despite these changes, we seem to have met our match in tartlettes. They're easy but elegant, homey but aesthetically pleasing; they contain a little childhood nostalgia, but they're easily made adult and gourmet with interesting, tasty toppings. We've started to incorporate tartlettes into more dinner party menus than we care to admit, and at last we're sharing our obsession with you.

From our kitchen, albeit small, to yours,

Cara and Phoebe, THE QUARTER-LIFE COOKS

**Recipe**

Smoked Mozzarella & Balsamic-Roasted Cipollini Onion Tartlettes
Makes 30 bites

Ingredients
2 sheets puff pastry
½ lb smoked mozzarella, coarsely grated
1/4 cup crushed tomatoes
1 clove garlic, minced
7 balsamic-roasted cipollini onions*, quartered
1/3 cup Parmesan

*To make the onions, half this recipe. Caramelized sliced onions made stovetop will also work.

Preheat the oven to 400 degrees.

Using a 2-inch circular cutter, cut the puff pastry into rounds. Line a baking sheet with parchment paper and arrange the rounds on it.

In a small bowl, combine the crushed tomato with the garlic and season with salt and red pepper.

Using a small teaspoon, place a dollop of sauce on each round, and use the back of the spoon to spread it over each tartlette. Cover each with a bit of the mozzarella, one of the onion slivers, and top it off with a sprinkle of Parmesan cheese.

Bake in the oven for 15-20 minutes, until the puff pastry has begun to brown, and the cheese is melted and becoming crusty. Remove and let sit for 5 minutes (the pastry will de-puff in that time). Then serve immediately.


Read more...

Monday, March 29, 2010

Cooking For Others: Marbella's Comeback

EVENT: A Weekend Away with Friends
VENUE: Kate's House, Hudson Valley
PARTY-SIZE: 10
TYPE: Friday Night Post-Drive Dinner
MENU: Chicken Marbella; Orzo; Milk Bar Compost Cookies

According to my mother, for a while in the 1980s, Chicken Marbella was all the rage. The Silver Palate Cookbook came out, and filled as it was with creative, delicious, and dinner party-worthy dishes, the surprising ingredients (prunes, capers, brown sugar??) and winning flavor combination of Chicken Marbella meant that it was served at party after party back then.

When Kate invited a bunch of us out to the country for a weekend, like Phoebe before me, I volunteered to bring dinner. I thought Friday night was the best for my contribution; it would mean we wouldn't have to go into town after arriving and we'd have time to relax at the house following the day of work and the drive. And because I was carrying the meal, I got to go in the first car, which left the city about an hour before the second. But with our detour, we all arrived at the house simultaneously.


As I unpacked the chicken and set water to boil for orzo, everyone opened beers and settled into the weekend. I imagined how different (and how much more expensive) this all would have been if we'd had to reorganize into cars, go into town, find a table for ten at the Mexican place. This way, we got to relax immediately, and maybe a little too much--instead of going to the local college bar to dance, we fell asleep in front of the living room TV.

The next day we spent walking around a beautiful park and the cute Hudson Valley towns. We made a big breakfast, but then during the day we drank hot chocolate and snacked on the leftover compost cookies Michelle brought. The cookies were so delicious and filling, we never sat down to eat a proper lunch. So by the late afternoon we were starving, and, in our hunger haze, we planned the heartiest meal ever: steak, mac and cheese, mashed potatoes, roasted asparagus. All of us girls went to the grocery store and came back equipped with ingredients, and prepping and cooking together (under my dominion, of course) was fun. Emma chided me for not getting enough cheese as she grated more and more into the mac; Kate and Julie mashed the potatoes; and Michelle took care of trimming, oiling, and roasting the veggies. Though I was glad I'd been able to feed everyone the night before, I wouldn't have traded in the evening of making a mess in the kitchen for all the Chicken Marbella in the world.

From my kitchen, where I'm bringing Marbella back, to yours,

Cara, THE QUARTER-LIFE COOK


Chicken Marbella
Serves 10
Recipe from
The Silver Palate Cookbook by Julee Rosso and Sheila Lukins. Copyright © 1982 by Julee Rosso and Sheila Lukins.

Ingredients

1/2 cup olive oil
1/2 cup red wine vinegar
1 cup pitted prunes
1/2 cup pitted Spanish green olives
1/2 cup capers with a bit of juice
6 bay leaves
1 head garlic , peeled and finely puréed
1/4 cup dried oregano
Coarse salt
freshly ground black pepper to taste
4 chickens (2 1/2 pounds each), quartered
1 cup brown sugar
1 cup dry white wine
1/4 cup fresh Italian (flat-leaf) parsley or fresh cilantro , finely chopped

Combine the olive oil, vinegar, prunes, olives, capers and juice, bay leaves, garlic, oregano and salt and pepper in a large bowl. Add the chicken and stir to coat. Cover the bowl and refrigerate overnight.

Preheat the oven to 350°. Arrange the chicken in a single layer in one or two large, shallow baking pans and spoon the marinade over it evenly. Sprinkle the chicken pieces with the brown sugar and pour the white wine around them. Bake, basting frequently with the pan juices, until the thigh pieces yield clear yellow (rather than pink) juice when pricked with a fork, 50 minutes to 1 hour.

With a slotted spoon, transfer the chicken, prunes, olives, and capers to a serving platter. Moisten with a few spoonfuls of the pan juices and sprinkle generously with the parsley or cilantro. Pass the remaining pan juices in a sauceboat.

Note: To serve Chicken Marbella cold, cool to room temperature in the cooking juices before transferring the pieces to a serving platter. If the chicken has been covered and refrigerated, reheat it in the juices, then allow it to come to room temperature before serving. Spoon some of the reserved juice over the chicken.

Read more...

Saturday, March 27, 2010

Potluck Parties: Passover

EVENT: Passover Seder
VENUE: BGSK's Extended Households
PARTY SIZE: 9; 37 (plus Elijah, obviously)
TYPE: Long, Drawn-Out Culturally Significant Dinner
MENU: Matzoh Ball Soup; Brisket; Potato Kugel with Sauteed Shallots; Nutty Passover Puffs

My Aunt Jennifer is responsible for most of my formative memories of brisket, and most of my positive experiences with passover. The highlights of the family meal were always the many chairs added year after year to make up for the many new additions to the table (remember Thanksgiving?); my undefeated record with the afikomen; Cousin Holly's Chocolate Chip Macaroons; and my aunt's brisket, which we would all be hankering for after two hours of bitter herbs, hard-boiled eggs, and plagues.

Passover has always been one of my favorite Jewish holidays, but in college, I couldn't always make it back to CT to Aunt Jenn's. My junior year, I was stuck at school and decided to host a seder of my own. My friend Jamie procured the prayer books and plenty of matzoh. Jillian made her mother's potatoes. And I provided the brisket.

It felt a little strange to deviate from my aunt's famous dish, but I managed to fill the buffet table with a respectable, if not, entirely perfect, slab of soft, slow-cooked meat.

This year, I'm looking forward to the real thing, and will be playing a supporting roll by making two vegetable sides (anyone have any ideas?). But as part of the lead-up to the holiday, I had to take another crack at this brisket.

Cara's also been testing out some of her family favorites for the blog, though it's been a while since it was last hosted at her mom's, rather than her uncle's (this means the opportunity to eat her mom's brisket, which she hasn't had since her pre-vegetarian days). Back when her friends hosted seders at college, the dining hall kindly provided lots of inedible food, so she didn't have to worry about cooking but was free to concentrate on wishing she were eating Phoebe's brisket and Jillian's potatoes instead.

This year, she's been working on a not-too-bland kugel, as well as flour-free desserts: this post's nutty meringue puffs, a chocolate almond cake, maybe a lemon mousse, and Passover-friendly brownies. Who knows, maybe she'll return to old favorites: Holly's Chocolate Chip Macaroons, "Free" Chocolate Cookies, Airy Chocolate Mousse, or even Brutti Ma Buoni.

From our kitchens, where we're eating second helpings for Elijah, to yours,

Phoebe, THE QUARTER-LIFE COOK

**Recipes**

Passover Brisket
Makes 12 servings

Ingredients

6 lbs brisket
8 garlic cloves, cut lengthwise into 4 pieces
1 quart beef stock
2 large onions, sliced
1 cup ketchup
1/2 cup brown sugar
2 tsp salt
1 tsp paprika
1 tsp onion powder
1 tsp garlic powder
1/4 tsp cayenne
1/2 tsp dried thyme
2 bay leaves

Preheat the oven to 500 degrees.

Using a paring knife, cut small incisions in the meat and shove the pieces of garlic into them. Do this until the meat is stuffed with garlic all over. Place the brisket in a rimmed baking dish (preferably metal) and brown it in the oven, about 10 minutes per side.

Remove the meat, and pour in the beef stock (NOTE: if you are using a pyrex dish, wait a few minutes for the pan to acclimate to room temperature so it does not shatter. For more on this, see my disaster here). Turn the oven down to 350 degrees, cover the dish with foil, and cook in the oven for 1 hour.

In the meantime, saute the onions in 1 tablespoon of olive oil over medium-low heat until soft and caramelized, about 25-30 minutes, stirring occasionally.

Remove the meat from the oven, and add the remaining ingredients to the pan. Using a fork, whisk them all together with the beef stock. When the onions have finished cooking, arrange them on top of the meat. Cover the pan again with foil, and return it to the oven for 2-3 hours.

NOTE: if you want to be able to cut the brisket into slices, take it out at 2 hours, or even a little before. If you want it to be falling apart, more along the lines of a pulled brisket, keep it in for the full 3.

Remove the meat from the oven, and transfer it to a cutting board. Slice the brisket against the grain into thick slices. Return the meat to the sauce and serve, or store in the fridge over night--the brisket can be made a day or two in advance.

Potato Kugel with Sauteed Shallots
Makes 1 8-inch kugel

Ingredients
2 shallots, thinly sliced
3 tablespoons neutral oil
2 medium baking potatoes (about 20 oz)
1 small onion
1 egg
1 egg yolk
1 1/4 teaspoons kosher salt
2 tablespoons olive oil
1/4 cup boiling water

Preheat the oven to 450°F. Put an 8-inch square pan in to preheat.

Heat 2 tablespoons of oil in a small skillet over medium heat. Cook, stirring occasionally, until the shallots are quite brown and crispy, about 10 minutes. Add 1/4 teaspoon salt and remove from the heat.

Grate the potatoes and onion into a bowl. Add the egg, yolk, 1 teaspoon salt, olive oil, boiling water. Scrape the shallots into the mix and toss everything together.

Take the pan out of the oven carefully. Pour in the remaining 1 tablespoon oil and use a brush to spread it around. Pour the kugel batter in and spread it out evenly. Return to the oven.

Bake for 20 minutes, then lower the heat to 375°F and bake for another 30. If you want, you can then preheat the broiler and toaste the kugel underneath it for a few minutes until brown and crusty. Let cool slightly before cutting into squares and serving.

Nutty Passover Puffs
Makes 30 Cookies

Ingredients
2 egg whites
1 3/4 cups sugar
1 teaspoon white wine vinegar
1 teaspoon vanilla extract
pinch salt
1 cup walnuts
1/2 cup blanched almonds
1/4 cup pecans
1 tablespoon peanuts
1 tablespoon pine nuts
1/4 cup semisweet chocolate chips

Preheat the oven to 300°F.

In a mini food processor, pulse the nuts with 2 tablespoons of the sugar. You want the nuts coarsely chopped, but it's okay if some get more finely ground than others. Remove to a small bowl and add the chocolate chips and 1 tablespoon of sugar. Grind the chocolate, then add it to the bowl with the nuts.

Beat the egg whites until they hold soft peaks. Gradually pour in the sugar, beating all the while, until the egg whites are sturdy and thick. Beat in the vinegar, vanilla, and salt.

Fold in the nuts and chocolate chips. Drop mounds the size of two tablespoons several inches apart on a baking sheet. Bake for 12-15 minutes, until just firm and crackly on top. Remove to a plate to cool completely.


Read more...

Thursday, March 25, 2010

Baking For Others: The Almighty Coffee Sable


There are desserts that you make by opening the cupboard and mixing together six or seven ingredients. Sturdy single-layer cakes, chocolate chip cookies, brownies--these are some of the delicious results of the simple "dump and stir" method of baking.

There are other desserts, however, that require a couple of building blocks. Layer cakes filled with mousse and topped with ganache require several steps. Sandwich cookies, trifles pavés, millionaire's shortbread--all these desserts have a bunch of components that the creator has to make separately and then assemble with care.

Often, my baking falls under the former of these categories. When I'm whipping up a dessert for a dinner party or as a gift, I'm most likely to make something that requires merely three steps: measuring, mixing, and baking. But there are also times when, per specific request or my own mood, I make something more involved. I think any baker recognizes the craving, not just for chocolate cake, but for the attentive assembly of multiple layers, and the mixing of flavored syrups, the whipping up of icing. Memorably, I once made a chocolate birthday cake for my sister's birthday that included a few layers of genoise, a coffee-chocolate syrup, crumbled chocolate chip cookies (made from homemade cookies, of course), whipped ganache for the filling, and a shiny chocolate glaze for the coating. It was summer vacation from college, and I didn't have much to do.

But the upside of all the hours in the kitchen making something like this (besides the existing merit of having spent several hours in the kitchen) is being left with the various components. You can build them up in different ways--something you can't do with a minimalist apple cake, say. An apple cake is what it is.

I developed these coffee sable cookies as part of a bite-sized tiramisu dish for a party Phoebe and I were catering. But when my dough yielded far more little circles than I'd expected, I was left with an excellent gift: coffee sable cookies at my whim. Some I kept around plain, for garnishing mouses and puddings and things. Some I sandwiched together with spoonfuls of chocolate ganache and wrapped up for my doorman, in exchange for his extra digital TV box (yes, I now have nine whole channels). It was fun to have the sables as a deconstructed building block, which I could then build up again in all different ways. It was fun in the way only a baker would understand.

From my kitchen, where chocolate and coffee match in all different ways, to yours,

Cara, THE QUARTER-LIFE COOK

**Recipes**

Coffee Sables
Makes about 50 1 1/2-inch cookies

These sables use ground coffee--not espresso powder, which is normally used in baking. You want to use pretty finely ground beans.

Ingredients
1 1/4 cups all-purpose flour
1/4 teaspoon salt
1/2 cup (1 stick) butter softened but not at all melty
1/2 cup confectioners' sugar
1 egg yolk
1/2 teaspoon vanilla extract
1 1/2 teaspoons ground coffee

Preheat the oven to 325°F.

Mix together the flour and salt and set aside.

Cream the butter and sugar with a mixer for a few minutes until very creamy. Add the egg yolk, vanilla, and coffe grounds and mix to combine. Then add the flour and use a spatula to incorporate the dry ingredients into the butter mixture. Once it's come together, press into a disk, wrap in plastic wrap and refrigerate for an hour or two, until firm. If you refrigerate longer (or freeze), let the dough stand at room temperature for about half an hour--until pliable--before trying to roll it out.

On a floured surface, roll the dough out until it's about 1/8-inch thick. It's easiest to do this half at a time. Cut into shapes--I use a 1 1/2 inch round cutter. Carefully lift the cookies onto a sheet, using a spatula if they feel delicate.

Bake for 6-10 minutes until just firm and slightly brown. Cool on the pan, then remove to a rack or plate.


To make 25 chocolate-dipped coffee sables:

Melt 3/4 cup of semi-sweet chocolate chipes until just liquid. Line a pan with parchment or wax paper, then carefully dip each cookie halfway into the melted chocolate. Arrange on the sheet and refrigerate until firm.

To make 25 chocolate-coffee sandwich cookies:

Heat a scant 1/2 cup of cream until nearly boiling. Pour over 6 ounces of semi-sweet chocolate. Let sit for a moment so the chocolate melts, then stir until the mixture is incorporated and smooth. Let it cool slightly so it's spreadable, then make sandwiches by putting one and a half teaspoons of chocolate filling between two cookies.

Read more...

Wednesday, March 24, 2010

Recipe Flash: Turkey Pepperjack Melts

WEEKEND BRUNCH MENU (FOR TWO): Turkey Pepperjack Melts; Sweet Potato Fries; Cilantro Slaw; Pickles

I love a good turkey sandwich. But for some reason, I’m not really the type of person who keeps regular old sandwich bread around. In New York, that’s easy enough to remedy. When I get the craving, I’ll often just make a pit stop at my corner deli and either order their version of my go-to turkey club, or, in this case, if I have some random sandwich fixings already, I’ll ask them to just sell me two pieces of whole wheat sandwich bread for 50 cents.

That’s how this sandwich came about. I inherited the leftover smoked turkey and sliced pepperjack from a lunch of cold cuts and grilled cheeses on this weekend away with friends. I rarely buy pepperjack on my own, but after melting it between two slices of bread slathered with my new favorite mustard, it might have become my new favorite sandwich cheese: its spiciness was the perfect complement to the sweet, hot mustard and a colorful backdrop to everyday turkey.

From my kitchen, albeit small, to yours,

Phoebe, THE QUARTER-LIFE COOK

**Recipe**

Turkey Pepperjack Melt
Makes 2 sandwiches Ingredients

2 tbsp butter
4 slices whole wheat bread
2 tbsp honey mustard (or this hot sweet mustard)
8 slices pepperjack cheese
8 slices smoked turkey breast

In a small bowl, heat the butter in the microwave until melted.

Lay the slices of bread on a work surface and brush on one side with the melted butter. Flip the bread over and slather the other side with mustard. Lay two slices of cheese on each slice of bread, followed by two slices of turkey. Sandwich each pair together.

Heat a small non-stick skillet over a medium-high flame. When hot, but not smoking, add one sandwich to the pan and cook until it is brown on both sides and the cheese is melted, about 2 minutes per side. Repeat with the remaining sandwich.

Cut down the middle and serve immediately.

Read more...

Monday, March 22, 2010

Working With What You Have: Shredded Squash


DISHES: Linguine Cacio e Pepe (con Zucca); Butternut Squash Risotto with Pancetta and Pecorino
TYPE: Weeknight Dinners for 2
MAIN INGREDIENT: Butternut Squash, Pecorino, Pasta/Rice

I love buying big beautiful butternut squashes at the farmers’ market, but my eyes are usually bigger than my guest list, and unless I am making a big stew or chili that incorporates the vegetable, I will have sections of it in my fridge for weeks. Even a small, one and a half pound squash can stretch a surprisingly long way, and I always end up with leftovers to throw on top of crostini or beneath a fried egg.

If I want to be sure to be rid of the squash at the end of a meal, I cut it up into cubes and roast it. The pieces crisp up, shrink down, and become an irresistible snack for guests, likely to be plucked up straight from the tray before you have a chance to transfer it to your salad, or pasta. In these cases, the squash always gets finished even if it looked like too much.

A few weeks ago, I had two meals for two planned two nights in a row. The easy solution budget-wise would have been to make one dinner for four and serve the leftovers to the unassuming guest the second night. But that’s really no fun for my stomach. So I picked up a butternut squash and shredded it up. This was labor intensive ( I have a rather dinky grater), but it meant I had a squash topping for two separate meals, without any leftovers.

I sautéed the shredded squash over low heat with a bit of butter, a touch of white wine, half and half, and a healthy addition of finely grated pecorino cheese at the end of the cooking process. The result was a decadent vegetable mixture, fine enough to stuff a ravioli but textured enough to mix into a pasta or risotto and have it stand on its own as a separate ingredient, not part of a sauce. And for my two dinners, I did just that.

The first night, I was joined by my friend Ali, whom I shared many a bowl of cacio e pepe pasta with during our semester abroad in Rome. I doctored the pasta as I would a traditional cacio e pepe, and I also mixed in some of the shredded squash with the hot pasta. The second night, I added the squash to my risotto as it finished cooking--just as Cara did for her French bistro-ish meal. The shredded pieces of squash allowed its sweetness to melt into the rice and complement the smoky pancetta I'd added at the beginning.

Next time I plan on buying an even bigger squash and freezing the shredded mixture for a third dinner many weeks down the line.

From my kitchen, where my elbow hurts from shredding squash, to yours,

Phoebe, THE QUARTER-LIFE COOK

**Other uses for Butternut Squash**

If you have half a butternut and don't feel like shredding it, here are some other ways to get through your squash:


**Recipes**

Linguine Cacio e Pepe (con Zucca)
Makes 2 servings

Ingredients

For the shredded squash:

2 tbsp butter
½ a 1 1/2lb butternut squash, seeded
¼ cup white wine
¼ cup half and half
¼ cup finely grated pecorino

For the pasta:

1/2 lb fresh linguine (or dried)
½ tsp freshly ground black pepper
¼ cup shredded pecorino cheese

In a medium non-stick skillet, melt the butter over medium-low heat and sauté the squash, still occasionally, until beginning to soften, about 3-4 minutes. Add the white wine and continue to sauté until the wine has reduced by half. Add the cream and cook gently for an additional few minutes, until the squash has fully softened, but is not falling apart. Fold in the cheese and remove from the heat.

NOTE: this can be done the night before and stored in the fridge. Double the recipe if you plan on making another meal that week, like the risotto below.

Bring a pot of salted water to boil and cook the pasta until al dente—if using fresh, this will only take a few minutes, if not, follow package directions. Reserve ¼ cup cooking liquid.

In a large bowl, combine the squash mixture, the black pepper, and half of the additional cheese. Add the drained pasta and toss to combine, adding some of the cooking liquid as necessary to create a creamy sauce. Taste for seasoning and add salt as necessary. Garnish with the remaining cheese and fresh parsley for a bit more color.

Butternut Squash Risotto with Pancetta and Pecorino
Makes 2 servings

Ingredients
2oz pancetta, finely chopped
2 shallots, sliced
2 garlic cloves, sliced
¾ cup Arborio rice
½ cup dry white wine
3 cups chicken or vegetable stock
2 cups shredded squash (recipe above)
1 tbsp chopped fresh parsley
2 tbsp pecorino

Coat a dutch oven or deep sauté pan with olive oil, and cook the pancetta until browned, about 5 minutes. Add the the shallot and garlic and cook until fragrant and beginning to brown, about 4 minutes. Add the rice and continue to cook for another few minutes so the grains are covered in oil and beginning to toast. Add ½ tsp of salt and the wine and cook, stirring, until nearly evaporated, about 1 minute. Return the heat to medium, and add 1 cup of stock, stirring occasionally until the rice has absorbed the liquid.

Turn the heat down to medium-low and continue adding the stock to the pot in ½ cup portions, stirring occasionally until each batch is absorbed before adding more. You don’t need to be constantly stirring, but you also want to make sure that the rice does not stick to the bottom of the pan. When the liquids are almost absorbed, add the next ½ cup of stock and repeat. During this time, if the liquids have absorbed, don’t be shy in adding more stock. This is not a precise science, it may end up being more or less than 3 cups total.

In the meantime, if you haven’t made it in advance, follow directions above for the shredded squash.

Once the stock is almost gone, and the risotto has only a slight bite to it, add the squash mixture. Cook for another few minutes, stir in half the parsley, and garnish with the remaining herbs and cheese.

Serve immediately.


Read more...

Saturday, March 20, 2010

Big Girls, Test Kitchen: Quinoa Stuffing

DINNER PARTY MENU: Lemon-Garlic Roasted Chicken Breasts; Pear Almond Tart

Stuffing was a strange recipe to come back to on a winter's night in of movies and board games. Thanksgiving-y fare is mostly left to Thanksgiving. Even if we occasionally wonder why we don't roast a turkey any other time, the truth is we don't. And we don't eat much stuffing, or much pecan pie, in February.

So I forget why I started browsing through our own archives, looking for Phoebe's post about the stuffing she was in charge of making for her family's Thanksgiving party. Maybe it was because I had an inkling that I owned most of the necessary ingredients--including an enormous and intimidating winter squash. Or maybe it was because I was going through a second (fifth?) love affair with the leek confit that made an appearance in our very first post. Either way, before I knew it, I was prepping all the various parts and concluding that bread would not be the vehicle for the flavorful squash, leek, sausage, and onion mixture. Rather, I'd use quinoa.

I know a lot of people are ambivalent about quinoa, and I get it. I think the taste varies from brand to brand, and I'm partial to the one in the turquoise box (called Ancient Harvest). Still, I think quinoa usually does need some spicing up. When I'm eating alone, I'll sometimes top it with some good olive oil, thyme, salt, pepper, and grated parm. But its nutritional value and great grainy flavor makes it a good candidate for a more complicated dish like this stuffing. It complements the vegetables, garlic, wine, and sausage, just as much as it is enhanced by them.

From my kitchen, where I'm reinventing Phoebe's old favorites, to yours,

Cara, THE QUARTER-LIFE COOK

**Recipe**


Squash, Leek, & Quinoa Stuffing
Serves 2-4

Here's the recipe, modified and cut down from Phoebe's to make dinner for two or three, or a side dish for four or six.

Ingredients
2-3 cups cubes of winter squash (I used kabocha, Phoebe used pumpkin)
1 leek, white and light green parts only, halved and thinly sliced
1 tablespoon olive oil
2 tablespoons water or stock
6 ounces sausage (optional; I used an apple and chicken sausage), removed from the casing
1 sweet onion, chopped
3 cloves garlic, minced
1/2 teaspoon dried thyme
2 tablespoons dry white wine
1 cup quinoa
1 egg, lightly beaten
2 cups chicken stock
2 tablespoons chopped fresh parsley

Preheat the oven to 375°F. Toss the squash with a drizzle of olive oil and a generous amount of salt and spread on a rimmed cookie sheet. Roast in the oven for 40-45 minutes, redistributing occasionally, until tender and beginning to brown. Remove and set aside.

In a 3.5 quart Dutch oven or casserole, warm the olive oil over medium heat. Add the leek and sauté for 5-10 minutes until the it begins to wilt. Add the water or stock, turn the flame to low, cover and cook for 15-20 minutes, stirring occasionally. Cook slowly until the leeks are completely soft and beginning to turn to mush. Take the lid off and cook uncovered until most of the liquid has evaporated. Season with salt. Add the baked squash to the Dutch oven, toss with the leeks, and set aside.

In a small frying pan, add a little olive oil, turn the heat to medium-high, and brown the sausage. Break it apart with your spatula as you go so the sausage crumbled into very small chunks. When properly browned, add to the pumpkin-leek mixture.

Turn the heat down to low, the onion, garlic, and thyme to the pot and sauté for 5 minutes, making sure to scrape up any brown bits from the sausage. When tender but not caramelized, add the white wine and season with salt and pepper. Continue to sauté for another 5 minutes or so until the vegetables are very tender and the alcohol in the wine has burned off. Add to the pumpkin-leek mixture.

NOTE: everything up to this point can be done 1-2 days before.

When ready to eat, toss the quinoa in with the veggies and sausage. Add the 2 cups of water or stock and the egg and stir well to distribute everything evenly. Cover and place in the oven. Cook for about 40 minutes, until the water is all absorbed and the quinoa is cooked. Remove the lid and cook for another 10 minutes until the top is slightly browned.

Serve hot, accompanied by a salad.

Read more...

Wednesday, March 17, 2010

Recipe Flash: Green Eggs & Ham

OTHER GREEN EGGS: Asparagus, Scallion, and Fontina Frittata; Spinach-Pie Quesadillas; Scrambled Eggs with Caramelized Onion, Arugula, and Smoked Gouda; Breakfast Quesadillas with Cilantro Chimichuri and Chipotle Crema

Last year I celebrated St. Patty's a few weeks early with hundreds of my fellow quarter-lifers out in Jersey, where there's a parade and some drinking. To get Hoboken St. Patty's started right this year, my friends Adam, Jamie, and Dave once again hosted a breakfast pre-game and I, once again, was lucky to be the guest of honor (aka kitchen wench). I made a similar McMuffin sandwich to last year's Green Eggs & Ham, but I upped my game a bit when it came to the different components. After the Arugula Pesto was conceived for my Prosciutto & Fontina Panini, I've been unable to reembrace the classic basil version of this condiment, and so I made that. I've also taken to adding chives and cheese to my scrambled eggs to make them extra colorful and decadent. On days like today, that extra color is green.

I may be a one trick pony when it comes to St. Patty's Day brunch. But I dare say the tricks are getting better.

From my kitchen, albeit small, to yours,

Phoebe, THE QUARTER-LIFE COOK
**Recipe**

Green Eggs & Ham Breakfast Sandwiches
i.e. English Muffins with Chive Scrambled Eggs, Prosciutto, and Arugula Pesto
Makes 12 servings

12 English Muffins, sliced
1 dozen eggs, beaten
1/2 cup shredded mozzarella
1/4 cup finely chopped chives
1 cup Arugula Pesto
12 slices prosciutto

Preheat the broiler.

Spread the muffins on a cookie sheet, cut side up and toast for a few minutes until golden brown, but not too crispy. Slather each half with arugula pesto. Set aside.

In the meantime, scramble the eggs slowly over low heat, scraping up the bottom as clumps begin to form. When the eggs are still very soft but not runny (i.e. almost done!), add the mozzarella, chives, and salt to taste. Cook for another minute or two until the cheese is melted and the chives are well incorporated.

Set out the eggs, pesto-covered muffins, and prosciutto buffet style and allow your guests to make their own sandwiches.

Best served with a big mug of Big Kid Hot Chocolate.

Jolly Green Giant

Read more...

Monday, March 15, 2010

Cooking For Others: Picky Eaters


EVENT: The Rents’ Belated Birthdays
VENUE: Phoebe’s Apartment, Flatiron
PARTY SIZE: 6
TYPE: Festive Celebratory Dinner; Side-by-Side Dishes
MENU: Spicy Chipotle Hummus; Classic Hummus; Spiced Lamb and Sweet Potato Kababs; Rosemary Monkfish Skewers; Yellow Rice Pilaf with Pinenuts and Parsley; Arugula Salad with 3-Herb Vinaigrette

When I was little, I mean really little, I was quite a picky eater. But my palate wasn’t refined to white foods like most children—I loved my veggies, perfectly prepared meat and fish, and all herbs. It was the usual kid stuff that I took issue with: pizza, hamburgers, hot dogs, and really anything that was conceptually hard to grasp. I couldn’t understand that soup was just a hot puree of the foods I normally ate. I didn’t like the idea of eating raw lettuce slathered in creamy dressing, and the concept of bread covered in tomato sauce and cheese was disturbing. Hamburgers and hotdogs didn’t come from any animal I knew, and therefore were out as well.

When my mother cooked, she cooked real food. The table was covered in bowls holding one item from each food group, and when I filled my plate with broccoli spears, roasted potatoes, and lamb chops, I did so without allowing the items to touch each other. I was kind of a purist in that sense. When I was 3, we moved to France, and they ate real food over there too. My favorite meal was sole meuniere with a side of haricot vert and French fries. When we moved back two years later, my mom packed peanut butter and nutella sandwiches in my lunchbox for school. And a year after that, I became a real American child and started trading them with my classmates in exchange for lunch money, so I could buy a hotdog.

Now, there are very few things I don’t eat, though I am still limited by almost the entire category of raw fruits (texturally disturbing). But the same cannot be said of my parents. My mother has always been the problem child. Her gluten and lactose intolerance, refusal to eat fish with high mercury content, and general dislike of most hot spices, including black pepper, means that sometimes when we go out to restaurants, there is not one item on the menu that she will eat. And when she chooses a basic chicken paillard or hanger steak, 9 out of 10 times, she will send it back at least once. It’s not her fault really. When you cook for yourself as much as she does, it’s hard not to be overly picky when others don’t prepare your dishes just so.

My dad, on the other hand, has always been easy. That is, until last winter when he decided to stop eating red meat and poultry. I now get email after frustrated email from my mom asking for vegetarian solutions, as she is so sick of making fish for the two of them she could scream.

Today, an ideal meal for my dad would be pasta (with cheese). For my mom, it would be steak. So when I offered to cook them both a belated birthday dinner (they were born ten days and 1 year apart), I was at a loss.

Side-by-Side Classic and Spicy Chipotle Hummus hanging out on my window sill.

I decided to employ a strategy Cara and I often use for mixed veggie-carnivore crowds: the skewer. I made lamb and sweet potato kababs for my mom, enhanced by Moroccan spices, and for my father, monkfish skewers with toasted ciabatta (he loves his carbs). To start, chipotle hummus with pita (spicy/with carbs) and classic hummus with carrot sticks (mild/gluten-free). It sounded like the ideal solution to please both parents.

Unfortunately, it turned into one of those disaster days: over-cooked lamb, under-cooked sweet potatoes, way too salty fish, bland, gummy rice. My guests humored me by putting their pickiness aside, and eating everything on their respective plates, even if both of their dishes failed to be cooked just so.

From my kitchen, where picky eaters don’t always leave hungry, to yours,

Phoebe, THE QUARTER-LIFE COOK

p.s. we would love to know how you accommodate the pickiest eaters at your table!

**Recipes**


Spiced Lamb and Sweet Potato Kababs
Makes 3-4 servings

Though the meal was bit of a disaster, I know exactly where I went wrong. Make sure you dry the lamb properly before skewering it, and that your broiler is very very hot. It may take 20 minutes are so to preheat.

Ingredients

4 garlic cloves, minced
1 shallot, minced
1 lemon, juiced
2 tbsp olive oil
1 tsp ground cumin
½ tsp ground coriander
1 tsp salt
1½ lbs boneless leg of lamb, cut into 1½ inch cubes

1lb sweet potatoes, peeled and cut into 1 inch cubes
10 bamboo skewers, soaked in water for at least 20 minutes

Combine all the first 7 ingredients in a small bowl and whisk together. Place the lamb in a large ziplock bag and pour the marinade over it. Seal and place in the fridge for at least 2 hours, or overnight.

Preheat the broiler, and line a baking sheet with foil.

Bring a large pot of salted water to boil. Cook the sweet potatoes until almost fully tender. Drain and set aside.

Remove the lamb from the marinade and pat dry with paper towels. Toss the sweet potatoes in the remaining marinade.

Thread the lamb and sweet potatoes on the skewers, alternating (you should have two of each on the skewer).

Arrange on the baking sheet and broil in the oven for 6 minutes, 3 minutes per side. Remove and allow to rest under foil for 10-20 minutes.

Rosemary Monkfish Skewers
Makes 3-4 servings

I used this Jamie Oliver recipe. It turned out great. One thing to keep in mind: do not heavily season the fish. The pancetta is very salty and will almost season the whole dish for itself. If you have a non-meat eater, leave it out altogether.

Preheat the oven to 425 degrees instead of 400.


Read more...

Saturday, March 13, 2010

Big Girls, Global Kitchens: A Dumpling Slideshow


EVENT: Food That Takes Two
VENUE: Cara's Apartment, Park Slope
PARTY SIZE: 2
TYPE: Interactive Valentine's Day Dinner
MENU: Meat and Scallion Pot Stickers with Tangy Soy Sauce; Momofuku Pork Bo Ssam with White Rice, Butter Lettuce Leaves, and Ginger Scallion Sauce; Nothing for Dessert (Phoebe on this development: "Do I even know you anymore?")

I began mooning over Andrea Nguyen's cookbook, Asian Dumplings, before it came out. I've owned it since December 25th, and I've read it cover to cover several times. But I hadn't cooked from it yet, and after hearing about all our readers' Valentine's Day cooking plans, I decided that the 14th was the ideal date for me, and a helping hand, to approach the dumpling book. Below is a slideshow of the meat and chive dumplings Alex and I rolled out, assembled, and pan-fried. All 32 of them made by hand, dough and everything. It only took a little more than an hour start to finish, but it was a really fun activity, and an easy one to do on the "dining room" table, since there's no room for rolling in my small kitchen.

Because Andrea Nguyen's directions and diagrams are so perfectly, accurately done, I didn't think I could do justice to them by typing them up. So follow her steps in my photos, and then heed my recommendation and buy or borrow the book.

I'll be posting about the Momofuku pork soon--for now, sate yourself on this pulled pork.

From my kitchen, dumplings and all, to yours,

Cara, THE QUARTER-LIFE COOK

**Slideshow**

the dough is made with boiling water


dumpling dough comes out of the food processor crumbly and resembling playdough


kneading


setting aside the warm dough in a plastic bag lets the gluten develop


the makings of the meat-scallion filling


meat and scallion filling


cutting the dough into dumpling wrapper size


each piece is flattened in a pool of flour


stacks of pressed dough


the initial flattening of the disks


rolling each circle out into a thin, 3 1/2" dumpling wrapper


piles of wrappers


assembled dumplings, pleated and everything


crowded into the pot


finished potstickers


going for a dunk in the tangy soy dipping sauce

Photography by Alex

Read more...

Thursday, March 11, 2010

Big Girls, Test Kitchen: Indoor Pulled Pork

DISH: Pulled Pork Sandwiches (Two Ways) with Fennel-Cabbage Slaw
TYPE: Slow-Cooked, Outrageously Delicious Dinner
MAIN INGREDIENT: Pork Butt

On the way back from my recent ski trip to Vermont, the car I was in stopped at a country deli to grab a few snacks for the road. The place was heaven—walls lined with homemade compotes, jams, and different varieties of maple syrup, its counters and cases filled with all sorts of homestyle delicacies. As we stood there, we watched two customers be served a huge (the size of my wingspan) skillet of mac ‘n cheese. Though we'd eaten a huge breakfast of cheesy scrambled eggs, bacon, and the remains of the No-Knead Bread before hitting the road, it seemed criminal not to at least give this mac 'n cheese a try. But then I noticed pulled pork sandwiches on the menu, and I thought it would be criminal not to give those a try too. I returned to the car with a shopping bag full of food.

Though not the best for car trips, the pulled pork sandwich was the most outrageously delicious mid-afternoon snack I’d had in a while. Then, when I got walked in the door of my apartment, I found a new Cook’s Illustrated in my mailbox. It featured an article about the best methods for Indoor Pulled Pork. I knew I was meant to make pulled pork. And make it, I did.

Making pork butt for pulled pork doesn’t require that much hands-on attention, but it does call for a massive chunk of time. The Cook’s Illustrated version requires 2 hours of brining, and 4 ½ hours in the oven. Curious about general pork-butt guidelines, I called up my friend Robbie, who has made it a Sunday tradition to slow-cook a pork butt for 5 hours and invite 20 people over to watch football and eat it.

Robbie said he has tried several cooking times and temperatures, but recommended that if I had an afternoon to kill, the best results are achieved by cooking the pork uncovered at a very low temperature (250 degrees) for 5 hours, and braising it in BBQ sauce towards the end to develop the "bark"--the crusty exterior. He doesn’t brine at all, which cuts down on the time.

Still, I was swayed by the feeling of destiny I had when I walked in the door and saw the Cook’s Illustrated, and after my inquiries, I decided to more or less follow their method. The result was incredibly bark-y and delicious, but perhaps not as moist as the versions I had eaten at Robbie’s, and though I made two different sauces, I am sad to report that both paled in comparison to the one slathering all that tender pork in the sandwich from Vermont.

From my kitchen, still striving for indoor pork perfection, to yours,

Phoebe, THE QUARTER-LIFE COOK

**Recipes**

Pulled Pork Sandwiches with Fennel-Cabbage Slaw
Makes 4-6 servings

Cook’s Illustrated featured three different options for the sauce, and being the indecisive person I am, I went with none of them, and instead made two different versions of my own. One is ketchup based, similar to what is used on this Manchurian Cauliflower, and the other was inspired by my friend Graeme’s BBQ sauce. The Fennel-Cabbage slaw was based on the one used by Last Night’s Dinner on her Food52 winning Smokey Pork Burger, and it added the perfect refreshing crunch to the sandwiches.

As for the method, I am going to tell you exactly what I did including the brine. But I can't wait to try it Robbie’s way, skipping the brine, and cooking it for 5 hours uncovered at 250 degrees. Also, if you want to save on time and ingredients, you can skip the wet-dry rub combo. Last but not least, Cara recently made pork butt the Momofuku way, and we'll be posting about the results of that soon.

Ingredients

For the pork sandwich:

1 cup salt
½ cup sugar
4 cups water
1 3lb pork butt
¼ cup mustard (Bone Suckin, or honey mustard would be interesting here)

1 tsp salt
1 tbsp sugar
1 tbsp chili powder (I used ground ancho)
¼ tsp cayenne

4-6 toasted challah or brioche rolls - something dense, buttery, and more substantial than your average hamburger bun.

In a large bowl or container, combine the salt, sugar, and water, and stir to dissolve. Submerge the pork in the brining liquid (I used a can of beans inside a ziplock bag to weight it), cover tightly, and refrigerate for 2 hours.

Preheat the oven to 350 degrees. Cover a baking dish with foil (trust me, you don’t want to have to clean this).

Remove the pork from the brine and pat dry with paper towels. On a work surface, using your hands, cover the entire surface area of the pork butt with the mustard. In a small bowl, combine the remaining salt, sugar, chili powder, and cayenne. Sprinkle the dry rub over the pork until fully covered.

Transfer the pork to the baking dish. Cover the dish with tin foil, tenting it in the middle so it is not touching the pork. Place in the oven and cook for 3 hours. Remove the foil and cook for an additional 1 ½ hours, or until the internal temperature is 200 degrees.

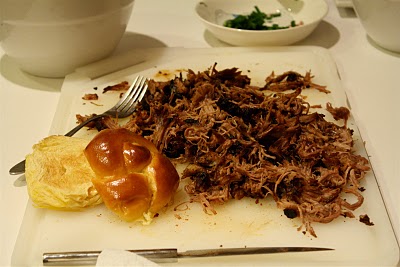
Remove the pork from the oven and allow to rest, tented with foil, on a work surface for 20 minutes. Shred the pork with two forks. Combine the pork with your desired sauce (recipes below) until moist and lightly dressed - you don’t want to overwhelm the pork flavor, and you can serve extra on the side for dipping as desired.

To serve, top each bun with a mound of pork, a spoonful of slaw (see recipe below), and extra sauce on the side.

NOTE: Pulled pork can last up to a week in the fridge. Store the meat and the sauce separately. When you want to eat it again, combine the two and microwave together so the pork stays moist.


Fennel-Cabbage Slaw
Makes 4 servings

Ingredients
1 lemon, juiced
1 tbsp Dijon mustard
½ tbsp cider vinegar
1 tsp sugar
½ tsp salt
1 tbsp olive oil
2 large fennel bulbs, trimmed, tough outer leaves removes, and very thinly sliced
1 small head of red cabbage, heart removed, thinly sliced
4 scallions, white and green parts, thinly sliced

In a medium bowl, whisk together the lemon juice, mustard, vinegar, sugar, and salt. Add the remaining ingredients and toss to combine.

Cilantro BBQ Sauce
Makes about 2 cups

Ingredients
10 cloves garlic, minced
2 jalapeno peppers, seeds and ribs removed, minced
1 1/2 cups generic BBQ sauce
1 leaves from 1 bunch of cilantro, finely chopped
½ cup beef broth

In a medium non-stick skillet, sauté the garlic and jalapeno in ½ tablespoon of olive oil over low heat. When soft and fragrant but not browned, add the BBQ sauce. Bring to a simmer, stir in cilantro, and cook gently for 5-10 minutes, until the cilantro leaves begin to melt away and the sauce has thickened.

Remove from heat, and whisk in ¼ to ½ cup beef broth - you want the sauce rather thin so it moistens the pork without overwhelming it.

Mix with the pork, or store in an airtight container for up to two weeks.

Smoky Chipotle Sauce
Makes about 1 cup

Ingredients
7 cloves garlic
1 cup ketchup
2 canned chipotle peppers in adobo
3 tbsp adobo sauce from can
½ cup beef broth (or water)

In a medium non-stick skillet, sauté the garlic 1 tablespoon of olive oil over medium heat. When just beginning to brown, add the ketchup. Bring to a simmer, stir in chipotle and adobo, and cook gently for 5-10 minutes, until the sauce has reduced by almost half.

Remove from heat, and whisk in ¼ to ½ cup beef broth - you want the sauce rather thin so it moistens the pork without overwhelming it.

Mix with the pork, or store in an airtight container for up to two weeks.

Read more...

Wednesday, March 10, 2010

Recipe Flash: Perfect Corn Muffins

EAT CORN MUFFINS AT BREAKFAST: Savory Leek Pancake with Smoked Gouda
EAT CORN MUFFINS AT LUNCH: Vegetarian Chili (Lentil-Bulgur or Smoky Chipotle); Shredded Cheddar Cheese; Yogurt

I'm always surprised by how much I enjoy a good corn muffin. They look so humble, and I can't really imagine myself ordering one at a cafe or anything. But I made these one day when a friend was supposed to stop by for coffee. He wound up not being able to make it, and the corn muffins wound up in the limbo of leftover sweets: the freezer. Yet whereas I sometimes manage to forget about the chocolate mousse, butterscotch cookie dough, and espresso brownies also stocked away in there, I continue to remember these muffins at all hours of the day. Toasted and buttered, they make a great breakfast; alongside chili or pulled pork, a great lunch.

From my kitchen, albeit small, to yours,

Cara, THE QUARTER-LIFE COOK


Corn Muffins
Makes 6

Ingredients
1/2 stick (1/4 cup) unsalted butter
3/4 cup all-purpose flour
1 1/2 teaspoons baking powder
1/2 cup yellow cornmeal
1/2 cup sugar, plus a little bit more to sprinkle on top.
1/2 cup whole milk
1 large egg

Preheat oven to 375°F.

Grease six muffin tins and line them with liners. Pour a little bit of water into the remaining six tins--this will protect your pan.

Melt butter and cool.

Into a large bowl sift together flour and baking powder and whisk in cornmeal, sugar and a generous pinch salt. In a bowl whisk together melted butter, milk, and egg and add to flour mixture.

Pour the batter evenly into the six cups. Sprinkle sugar (coarse if you have it) over the tops of each.

Bake for 15 minutes, until the muffins have risen and are firm and a toothpick inserted into the cornbread comes out clean.


Read more...